
A Yo-Yo starts as a circle of fabric and ends in a bunched, 3D circle:

Watch my tutorial on making a Yo-Yo:
Step-by-Step instructions to make a Yo-Yo:
1. Cut a circle out of fabric. It doesn't matter what size, but the finished yo-yo will end up being a little less than half the size that you start with. So if you start with a 2"circle, you'll end up with about a 3/4" yo-yo.
2. Thread a needle with a similar thread color to your fabric. I use a 28 weight thread, but if you're using a lighter weight thread, use 2 strands. Don't tie a knot in the end.
3. With the wrong side of the fabric up, fold the edge of the fabric in about 1/4" and start stitching around the entire circle. Take stitches about 1/4" as well. At this point, your yo-you should look like this:
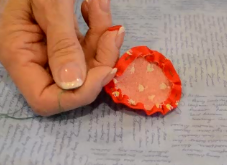
4. Pull on both ends of the thread to gather the fabric and then tie the ends in a knot. This will create sort of a pouch, and it's not pretty...yet.
5. Take your pouch and push the center down and pull the sides out until it lays flat. Arrange the gathers so they look even.
6. With the needle still threaded, poke straight through the center of the gathers and out the back end. Thread other thread and repeat so both strands are sticking out of the back.
7. Tie the two threads in a knot at the back of the yo-yo, and you're ready to applique on your quilt!
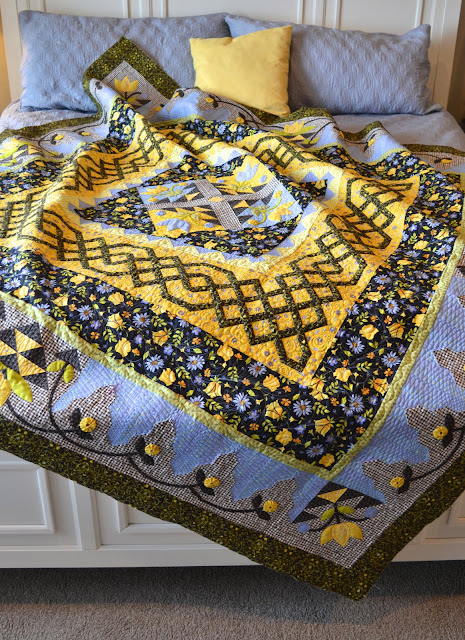
One of the quilts I've used yo-yos on recently is my Meadow Weaver Quilt. I used blue and yellow yo-yos as little flowers in the center medallion and yellow along the border.
Thanks for following along and let us know what fun things you do with Yo-Yos!
2 comments:
I always wondered how to make a Yo-Yo - I'm going to give this a try! Thanks so much for the tutorial!!
A fabulous quilt - love it. Thanks for sharing,
Post a Comment